

PC Client Quick Connect
Connect eight PC AI clients to CoffeeRouter with clearly identified native import, web import, and copied configuration workflows.
Connect an existing CoffeeRouter token to eight popular desktop and web clients without entering endpoint details from memory. This guide separates native client import, web import, and manual configuration so you always know what will happen before you continue.
Overview and Use Cases
Use PC Client Quick Connect when you want to:
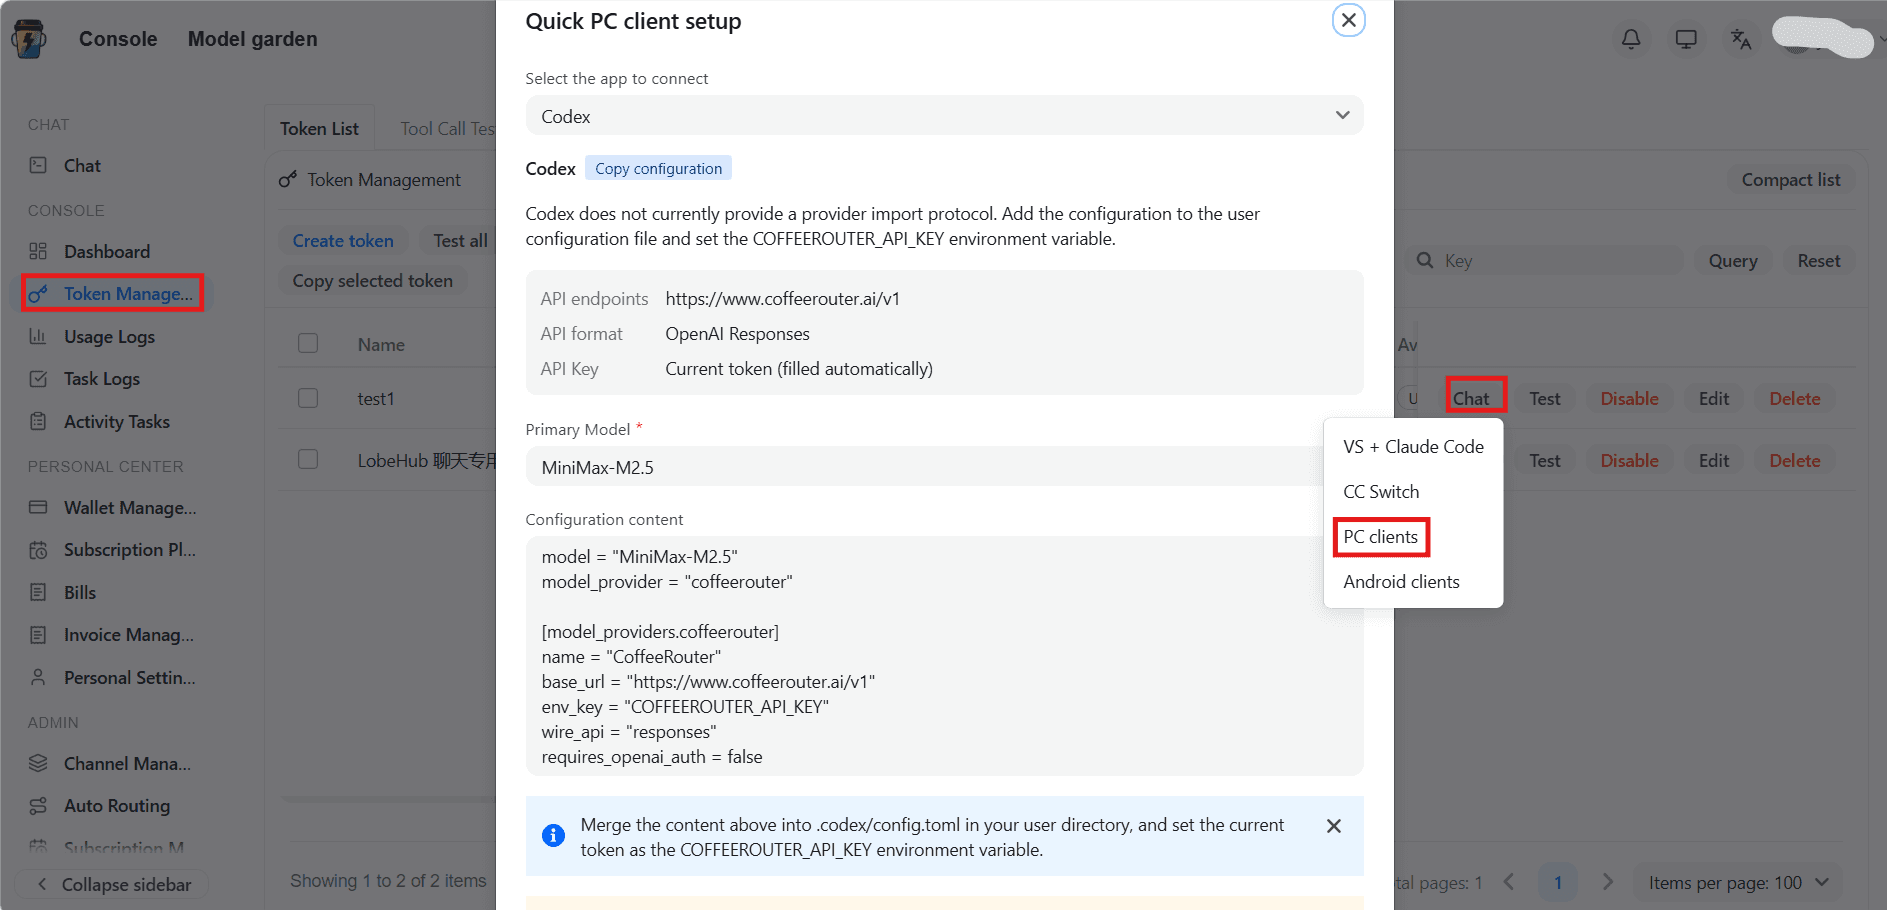
Open the PC Clients Dialog
- Sign in to the CoffeeRouter console.
- Open Token Management.
- Find an existing token and click Chat in that row.
- Select PC Clients.
- Choose the client you want to configure.
Connection Method Comparison
| Client | Connection method | API endpoint | API format | Important note |
|---|---|---|---|---|
| Codex | Copy configuration | Site URL + /v1 | OpenAI Responses | Merge the configuration into the user's .codex/config.toml and set the COFFEEROUTER_API_KEY environment variable. |
| Cherry Studio | Native client protocol import | Site root, without /v1 | OpenAI Compatible | After importing the provider, fetch or add models in Cherry Studio. |
| Chatbox | Native client protocol import | Site root, without /v1 | /v1/chat/completions | Select a primary model before importing. |
| LobeHub | Copy configuration | Site URL + /v1 | OpenAI Compatible | Enter the copied endpoint, token, and selected model in LobeHub's OpenAI provider settings. |
| NextChat / ChatGPT Next Web | Open the web app for quick import | Site root, without /v1 | OpenAI Chat Completions | Uses a NextChat settings fast-link. |
| ChatWise | Copy configuration | Site URL + /v1 | OpenAI Responses | Add a custom Provider in the desktop client. |
| Jan | Copy configuration | Site URL + /v1 | OpenAI Compatible | Add a Custom Provider in Jan. |
| Msty Studio | Copy configuration | Site URL + /v1 | OpenAI Compatible | Enter the values manually under Online Providers. |
For the hosted CoffeeRouter service, the site root is https://www.coffeerouter.ai and the versioned API base is https://www.coffeerouter.ai/v1. If you use a self-hosted CoffeeRouter instance, replace only the origin with your own trusted deployment.
Official Downloads
Install clients only from their official websites or repositories. External links open in a new tab.
Download Codex
Download Cherry Studio
Download Chatbox
Download LobeHub
Download NextChat
Download ChatWise
Download Jan
Download Msty Studio
Client Setup
Codex
- Method: Copy configuration
- API base:
https://www.coffeerouter.ai/v1 - API format: OpenAI Responses
- In the PC Clients dialog, select Codex and copy the generated configuration.
- Open the user-level Codex configuration file at
~/.codex/config.toml. On Windows, this is under%USERPROFILE%\.codex\config.toml. - Merge the generated provider block with your existing configuration instead of overwriting unrelated settings.
- Set
COFFEEROUTER_API_KEYin your user environment to the CoffeeRouter token. - Restart the desktop app or terminal so it receives the new environment variable, then select the configured model.
The resulting structure is equivalent to:
model = "your-model-id"
model_provider = "coffeerouter"

[model_providers.coffeerouter]
name = "CoffeeRouter"
base_url = "https://www.coffeerouter.ai/v1"
env_key = "COFFEEROUTER_API_KEY"
wire_api = "responses"
Set the environment variable to sk-your-api-key. Do not paste the token directly into config.toml; Codex officially supports reading the provider key from the environment variable named by env_key.
Cherry Studio
- Method: Native client protocol import
- API base:
https://www.coffeerouter.ai - API format: OpenAI Compatible
- Select Cherry Studio in the PC Clients dialog.
- Use the import action shown by CoffeeRouter and allow the browser to open Cherry Studio.
- Review the provider name, API base, and masked token before confirming the import.
- Open the imported provider in Cherry Studio and fetch the available models, or add the required model IDs manually.
- Select a model in the chat view and send a test message.
This is a real client-protocol import. The public documentation intentionally does not display the complete import URL because it may contain the active token.
Chatbox
- Method: Native client protocol import
- API Host:
https://www.coffeerouter.ai - API Path:
/v1/chat/completions
- Select Chatbox in the PC Clients dialog.
- Select the primary chat model that Chatbox should use.
- Use the import action and allow the browser to open Chatbox.
- Confirm that the API Host is the site root and the API Path is
/v1/chat/completions. - Save the provider and test the selected model.
Chatbox combines the Host and Path. Do not use https://www.coffeerouter.ai/v1 as the Host, because that would duplicate the version segment.
LobeHub
- Method: Copy configuration
- API base:
https://www.coffeerouter.ai/v1 - API format: OpenAI Compatible
Copy the following values from the CoffeeRouter PC Clients dialog:
| Setting | Value |
|---|---|
| Provider Name | CoffeeRouter |
| API Format | OpenAI Compatible |
| API Endpoint | https://www.coffeerouter.ai/v1 |
| API Key | The current token selected in Token Management |
| Model ID | The model selected in the CoffeeRouter dialog |
In the LobeHub OpenAI provider settings, enter the API Endpoint and API Key. Then add the copied Model ID, or enable the corresponding model if it already appears in the model list. Save the provider and send a test message with that model.
Use the actions in this order:
- Copy configuration in the CoffeeRouter PC Clients dialog.
- Select Open LobeHub Settings below and enter the copied values.
- If the client is not installed, select Download LobeHub below.
NextChat / ChatGPT Next Web
- Method: Open the web app for quick import
- API base:
https://www.coffeerouter.ai - API format: OpenAI Chat Completions
- Select NextChat / ChatGPT Next Web in the PC Clients dialog.
- Review the destination and settings summary before opening the generated fast-link.
- Open the NextChat web page and confirm the imported service URL and model.
- Save the settings and send a test message.
- Clear the URL from browser and clipboard history if it contained the token.
NextChat uses a Settings fast-link. This is a browser-based quick import, not a native desktop-client protocol. The complete fast-link is intentionally omitted from this static page.
ChatWise
- Method: Copy configuration
- API base:
https://www.coffeerouter.ai/v1 - API format: OpenAI Responses
- Select ChatWise in the PC Clients dialog and copy the displayed endpoint, token, and model ID.
- In ChatWise, add a Custom Provider.
- Choose the OpenAI Responses-compatible format.
- Enter
https://www.coffeerouter.ai/v1,sk-your-api-key, and the copied model ID. - Save the provider, select it in a new chat, and send a test message.
ChatWise does not use a CoffeeRouter import protocol for this setup; each value must be copied into the client.
Jan
- Method: Copy configuration
- API base:
https://www.coffeerouter.ai/v1 - API format: OpenAI Compatible
- Select Jan in the PC Clients dialog and copy the configuration values.
- In Jan, open the model-provider settings and add a Custom Provider.
- Select the OpenAI-compatible provider type.
- Enter
https://www.coffeerouter.ai/v1,sk-your-api-key, and the required model ID. - Save the provider, activate the model, and start a test conversation.
Jan requires manual provider configuration; copying the values does not install or open the client automatically.
Msty Studio
- Method: Copy configuration
- API base:
https://www.coffeerouter.ai/v1 - API format: OpenAI Compatible
Msty Studio supports custom OpenAI-compatible providers. By configuring the CoffeeRouter API endpoint and token, you can use Claude, GPT, Gemini, and other models available to your token in Msty Studio.
Read Msty Studio's official online-provider guide
Msty Studio uses manual fields and does not support a CoffeeRouter one-click import protocol for this flow.
Before You Begin
Make sure that:
- You have installed the latest version of Msty Studio.
- You are signed in to the CoffeeRouter console.
- You have created an active token on the Token Management page.
- The token has access to the chat models you want to use.
Add CoffeeRouter
- Select Msty Studio in CoffeeRouter's PC Clients dialog and copy the displayed configuration.
- Open Msty Studio and go to Model Hub → Model Providers.
- Select Add Provider.
- Under Provider, choose OpenAI Compatible.
- Enter the following values:
| Field | Value |
|---|---|
| Provider Name | CoffeeRouter |
| API Endpoint (Inference Endpoint) | https://www.coffeerouter.ai/v1 |
| API Key | Your CoffeeRouter token, for example sk-your-api-key |
Use HTTPS and include exactly one /v1 segment. Do not enter a duplicated path such as:
https://www.coffeerouter.ai/v1/v1
Add Models
After entering the provider settings, select Fetch Models to retrieve the available model list.
If Msty Studio cannot retrieve the models automatically, add them manually:
- Return to Token Management in CoffeeRouter.
- Check the models available to the current token.
- Add each required model ID to Msty Studio exactly as it appears in CoffeeRouter.
- Save the provider configuration.
Model IDs are case-sensitive and must match the names shown by CoffeeRouter exactly.
Start Using CoffeeRouter
- Create a new conversation.
- Open the model selector.
- Find the CoffeeRouter provider.
- Select the model you want to use.
- Send a test message.
Common Issues
401 or invalid API Key
Check that you copied the complete CoffeeRouter token (represented here by sk-your-api-key), the token is enabled and has not expired, sufficient quota remains, and any token IP allowlist permits access from the current device.
The model list cannot be retrieved
Skip automatic retrieval and manually add model IDs from the list allowed by the CoffeeRouter token.
404 response
Confirm that API Endpoint (Inference Endpoint) is exactly:
https://www.coffeerouter.ai/v1
Do not omit /v1 or add it twice.
Can I use Claude models?
Yes. When Msty Studio connects through the OpenAI Compatible provider, Claude models are called through CoffeeRouter's OpenAI-compatible API. Standard chat and streaming usually work, while support for Anthropic-specific features depends on the capabilities Msty Studio exposes for custom providers.
Why Some Addresses Include /v1
CoffeeRouter supports several API formats, and clients assemble the final request URL in different ways:
- Site root, without
/v1: Cherry Studio, Chatbox, and NextChat expect an origin or keep the request path separately. For example, Chatbox combines the Host with/v1/chat/completions. - Versioned base, with
/v1: Codex, LobeHub, ChatWise, Jan, and Msty Studio expect a versioned API base and then append a resource such as/responsesor/chat/completions.
Always use the value shown for the selected client. Adding or removing /v1 without checking the client's URL behavior can produce a duplicated path or a request to a nonexistent endpoint.
Security and Compliance
- Treat generated import URLs as secrets, even if they work only once.
- Treat copied LobeHub configurations as secrets because they contain the selected token.
- Do not publish complete Deep Links or NextChat settings fast-links.
- If a token may have leaked, disable or delete it in CoffeeRouter Token Management, create a replacement, and configure the client again.
- Use your own CoffeeRouter deployment, or confirm that the service operator has legitimate upstream authorization and fulfills all applicable compliance obligations. Never connect an unknown API endpoint or key to a production environment.
Frequently Asked Questions
Which clients support a real one-click client import?
Only Cherry Studio and Chatbox use native client import protocols in this flow. NextChat opens a web page and imports browser settings. Codex, LobeHub, ChatWise, Jan, and Msty Studio require copied configuration.
Why do some addresses include /v1 while others do not?
Each client constructs its final request differently. Use the site root when the client
appends a complete versioned path, and use the /v1 base when the client appends only the
API resource. Follow the value listed for that client rather than applying one address to
every app.
Why does Codex require an environment variable?
The Codex Provider configuration uses env_key = "COFFEEROUTER_API_KEY" to read the token
from the process environment. This keeps the secret out of config.toml and follows the
official custom-provider configuration model.
What should I do if an import action does not open the client?
Install or update the client from its official download link, return to the CoffeeRouter dialog, and try again. Allow the browser to open external applications when prompted. For copy-based clients, open the application manually and enter the displayed values.
How do I configure LobeHub?
Copy the LobeHub configuration from the CoffeeRouter PC Clients dialog, open LobeHub's OpenAI provider settings, and enter the endpoint and token. Then add or enable the selected model. This is manual configuration, not a provider-import link.
How do I revoke or replace a client token?
Disable or delete the old token in CoffeeRouter Token Management, create a new token, and repeat the configuration for every affected client. Also clear any import URL from browser and clipboard history.